Frequently Asked Questions
General
Before you buy our products, we suggest to first download the software and try it. The software is fully functional but will produce a watermark on the outputted images. The Pano2VR Pro trial limits the amount of images that can be imported to 4.
To get the trial version:
The forum is a public board where you may post your question, work or try to help others. It’s a great community, don’t be shy!
To join the forum:
- Send us an email to request an account. Include your preferred username and email address.
- After receiving the forum account information, log in.
- Participate.
By default, Pano2VR and Object2VR both check for updates every 7 days. If the update is incremental, it will download and install it automatically. If it is a major release, it will require a manual download and install.
- A major release/update is an increase in the version number. For example, from 1.0 to 2.0; 2.0 to 3.0, etc.
- Inter-version updates are incremental versions. For example, from 4.0 to 4.0.1.
NOTE: You do not have to uninstall older versions!
Updating to a major release
For all major releases you will need to download and install the new version. Also, all major releases require a new license.
- Download the latest version of Pano2VR by doing one of the following:
- In Pano2VR or Object2VR, go to Help > Check for Updates. Select, Yes, in the dialog that appears. A browser window will open to Garden Gnome Software’s Pano2VR’s download page. Choose your operating system to download.
- Go directly to the download page to download the installer.
- Install:
- Mac: Open the DMG and drag the Pano2VR or Object2VR logo on to the Applications folder.
- Windows: Open the EXE and follow the installer’s directions.
- Linux: Unzip/extract the tar.gz file. And then follow the instructions provided by one of our users for installing Pano2VR on Ubuntu.
- Open the new version. When it opens it will ask you for a license key.
- Enter your new license key or use the trial version.
NOTE: The trial is fully functional and does not time out. All outputs will have distinct watermarks added to them.
Updating to an incremental release
All incremental updates are free (included with your license) and are simple to install:
- Go to Help > Check for Updates. Select, Yes, in the dialog that appears.
Pano2VR or Object2VR will download the update and will automatically install the new version.
NOTE: If, Check for updates, is selected in the Settings or Preferences, a dialog will pop up on opening alerting you of the update. - Reopen the software and continue working.
By default, when you hit the Generate Output button, the project is created and then it opens in your default browser.
Your project has not been published or put online. Rather, the Integrated Web Server is activated so you can immediately view your project before adding it to your website.
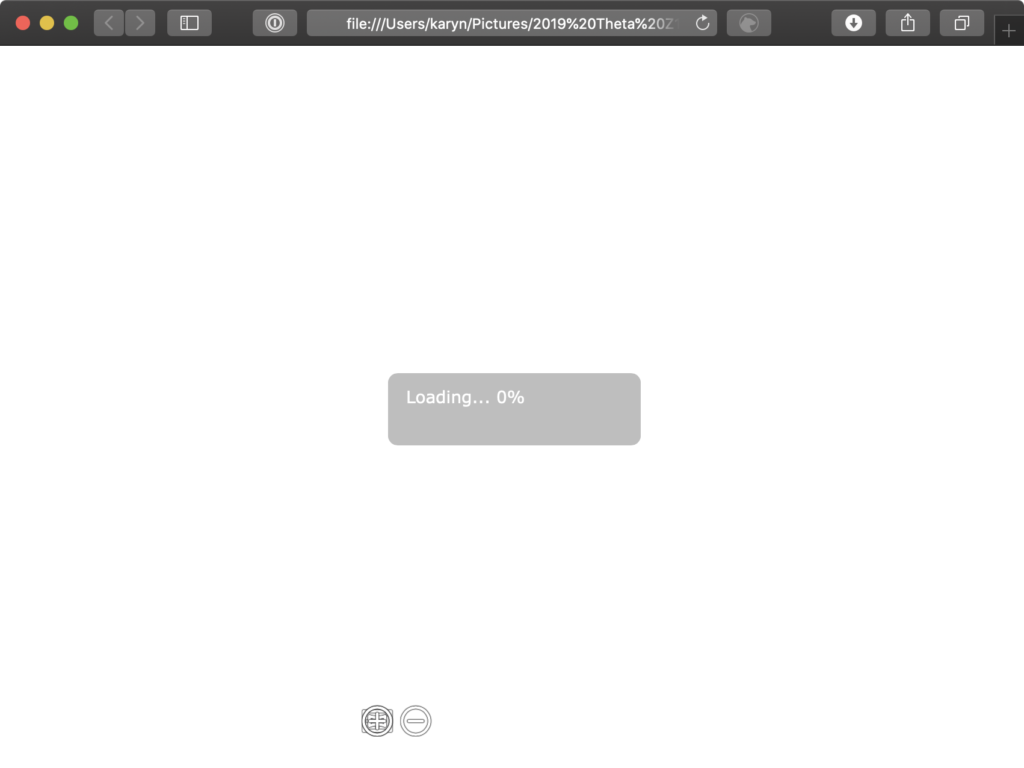
However, if you’re trying to open the panorama or object movie directly from the output folder, you’ll probably see something similar to the image below. This is because browsers have local file restrictions which prevent you from viewing the panorama or object. Once the files are uploaded to a server you should have no issues viewing the output.
Each browser can have its local file access settings changed. We’ve provided how to do this for the main browsers:
Chrome
Windows:
- Close Chrome.
- Go to Chrome’s location on your computer. (Usually found in the Applications folder.)
- Hold down shift and right-click to show Open command window here in the context menu. Select Open command window here.
- Enter:
Chrome.exe —allow-file-access-from-files - Restart Chrome.
macoS
- Quit Chrome.
- Open Terminal.
- Enter:
open /Applications/Google\ Chrome.app —args —allow-file-access- - Reopen Chrome
Firefox
- Open Firefox and enter
about:configin the search bar. A “Proceed with Caution” page will appear. Click, “Accept the Risk and Continue.” - In the search bar that says, “Search preference name”, enter
security.fileuri.strict_origin_policy. - Change that setting from true to false
Safari
This requires an extra step of enabling Developer’s Mode.
- Open Safari’s Preferences.
- In the Advanced tab, select Show Develop menu in menu bar.
- Go to the Develop menu.
- Select Disable Local File Restrictions
MS Edge
- Open a new tab.
- Ctrl+O
- Navigate to the HTML file
Most likely, not all files were uploaded to the server, or they are not located in the same directory. Make sure all the output files are in the project’s folder.
Yes! All programs work completely independent from each other!
You can even install different versions of the same program. Just make sure the programs are in different directories during installation, and later you can change the name of the programs to reflect their version, i.e., Pano2VR 6.0, Pano2VR 7beta, and Object2VR 3.0.
Most likely, you are trying to use the same log in with the same user name and password for either account. Both the website and forum accounts require different log in credentials.
To log on to the forum, you will need to send an email request for an account to be created.
If you’ve purchased a license, your account on our website has already been created; you just need to activate it. You can do this by requesting to have your password reset:
- Click the Login button at the bottom of the page.
- Click, Request new password.
- Enter the email address associated with your license. You’ll be sent an email with an activation link.
- Follow the activation link to reset the password.
- Log in with your new password.
If you are experiencing problems with our software and want to report the issue, we suggest first searching the forum and ask other forum members if they are experiencing the same issue. This will give you an indication of whether it is a problem with your system and/or setup or if others are also experiencing the same issue.
We monitor the forum and provide answers to questions there so everyone can see the solutions. However, if you would rather not report in the forum, you can send an e-mail to: support@ggnome.com. Please remember to include the information below:
When reporting an issue either in the forum or by email, please make sure you give the following information:
- Software & version number: Object2VR or Pano2VR; 32 bit or 64 bit
- Platform & version number: Windows, Mac, Linux, iOS, Android, etc.
- Browser
- Detailed description of the issue and the steps to reproduce
Remember, pictures can say a thousand words! Screenshots of your problem can be very helpful.
This error will pop up if the browser does not allow local access to your files for the HTML5 ouput. To avoid this locally (your computer), do one of three things:
- open the project directly from Pano2VR/Object2VR by clicking the Open output file button, or
- access the output via the integrated web server (Pano2VR/Object2VR), or
- upload the project to your web server, or
- create a desktop application (Pano2VR/Object2VR).
Sometimes, you’ll need to send the project to a client, and they’ll see this error, too. To avoid this issue, simply select, Embedded XML, in the settings for the normal.ggt HTML template.
An unbranded license allows the user to hide the About Pano2VR… or the About Object2VR… menu option found within the right-click context menu of the HTML5 or Flash outputs.
You are seeing this change because most likely your input image is using a colorspace other than sRGB. Make sure your image is converted to sRGB before importing.
You’ll find online manuals in the Documentation section. They are offered in English and provide both video and written tutorials. If you’re looking for a specific topic, use the search box at the top of the page.
Yes, the license includes free distribution of all output files, including GGPKG files.
You can also modify all files, except the player (pano2vr_player.js and object2vr_player.js)
Please note: You are not allowed to create your own products based on just the player. Please contact us if you plan to create such a product.
If you’ve purchased a license, your account on our website has already been created; you just need to activate it. You can do this by requesting to have your password reset:
- Click the Login button at the bottom of the page. Or go to: https://ggnome.com/user.
- Click the tab, Request new password.
- Enter the email address associated with your license. You’ll be sent an email with an activation link.
- Follow the activation link to reset the password.
- Log in with your new password.
This account is used to manage your licenses, payment options, and the Gnome Cloud account.
If you need a forum account, please write to us with your preferred username.
Sometimes writing an email is the best outlet for support. Send your questions, issues, etc., to support@ggnome.com. We make every effort to send a reply within a day or two of receiving the email.
When reporting an issue, give us as much information about your problem as you can. It will let us help you quicker.
If you need immediate help, you can call our support team at +44 1206 734111.
If you’re looking for help in getting your tour created or a skin built, take a look at this list of 3rd-Party services.
If you have an EDU license for a computer lab, you may want to store the license key for each computer rather than for each user account. Pano2VR and Object2VR will also check the local machine registery path for keys, so you can store the license key at this path instead of the current users registry.
For example: For Pano2VR 5 the license key can be stored on Windows at:
[HKEY_LOCAL_MACHINE\Software\GardenGnomeSoftware\Pano2VR\license]
"key_v5"="yourkey"
In Mac OS X you can copy a plist file with the key from
/Users/your_username/Library/Preferences/com.gardengnomesoftware.Pano2VR.plist
to
/Library/Preferences/com.gardengnomesoftware.Pano2VR.plist
The Garden Gnome Package Viewer for desktops is built using Electron. The app uses Chromium to open and display packages created by Pano2VR or Object2VR in a browser similar to Chrome.
The Desktop Package Viewer checks for new app versions on Garden Gnome’s server from time to time but does not send any data. However, if the packaged tour requires external content like Google Maps, then this will need to fetch the map tiles from Google’s servers.
Thomas Bredenfeld deckt weite Teile von Pano2VR in seiner 4. Ausgabe des Panoramabuches ab. Weiters gibt es auch noch das Online Videotraining für Pano2VR bei Linkedin Learning.
Gnome Cloud
As you approach your traffic limit, you will receive an email alert at 50% of your traffic limit and another at 80%. These alerts should give you time to change your subscription before hitting the limit.
If you do go above your traffic limit, the project will be blocked, and visitors will see the error: 503 service unavailable.
Additionally, we will send “blocked” and “restored” emails from noreply@gnome.cloud. We suggest adding this email address to your email program’s safe list.
If you’re hitting the daily or monthly traffic limit, you can upgrade your subscription tier to increase the limit.
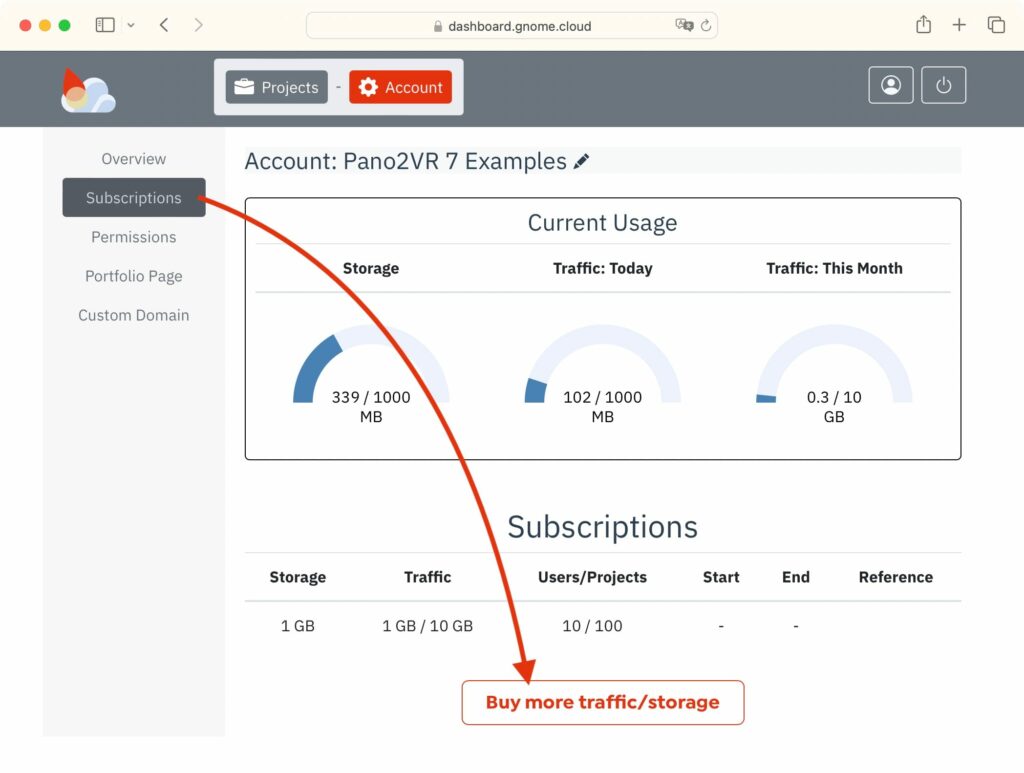
To upgrade:
1. Log in to the Gnome Cloud Dashboard.
2. Go to Subscriptions.
3. Then, click Buy more traffic/storage.
The daily limit will lift at 00:00 UTC. The monthly limit is lifted on the first of every month at 00:00 UTC.
If your subscription expires and there are projects uploaded to Gnome Cloud, your projects will be temporarily blocked until you reinstate the subscription.
Yes, you can have multiple accounts, and each account can have multiple users. To add an account, register here.
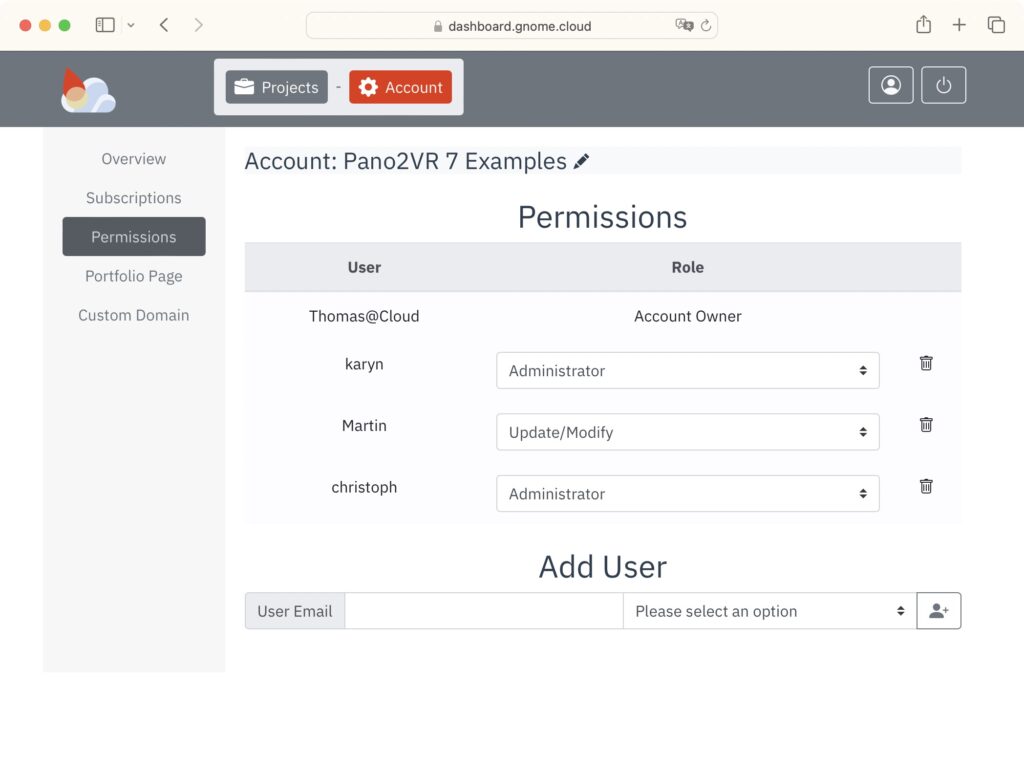
To add additional users:
- From the Gnome Cloud Browser in Pano2VR, open the Gnome Cloud Dashboard or log in directly.
- Select the account that should have additional users.
- Go to Permissions.
- Under Add User, enter the email address of the additional user and then apply a role for that user.
Yes. The subscription doesn’t need to come from the account owner. The client can create an account on Gnome Cloud, purchase the subscription, and add you as a user.
Yes! White-Label hosting means that our hosting is not branded. The URL used for your project does not indicate our brand, and there are no restrictions on how the project URL is used.
Gnome Cloud is using Amazon S3 with multiple availability zones to host your projects and delivering them with AWS Cloudfront with over 400 edge locations and 13 second-level caches around the globe.
Absolutely! There are no restrictions on usage.
Yes! We only need consent to host your content and deliver it on your behalf, and you keep all the rights. You can read our Terms of Service.
We are charging 1:1 of what we pay to Amazon. We try to offer a professional solution that works on a global scale and not for a small audience located near a single web server.
Our plan is not to compete on price with cheaper hosting solutions but to offer a turn-key solution for users that don’t want to manage the content delivery themself.
License
This could be the result of one of the following:
- Using a license key intended for a different version, e.g. Pano2VR V3.0 key with Pano2VR V4.0
- Using a license key for a different Garden Gnome Software product, e.g. Pano2VR key to try and activate Object2VR.
- A space is added when copy and pasting; look at the start or end of the key and remove any added spaces.
- In some cases it’s possible that the incorrect characters were used; I (upper case i), l (lower case L) and 1 (number one) look very similar, the same goes for 0 (number zero) and O (upper case o).
The license will not expire and includes free updates for the version/release purchased. Major releases of the software will require a paid upgrade.
A single license is valid for one user. More users can be added during or after the initial purchase. Please see, How can I add users to my license? or How do I purchase your software?.
Each user can activate up to 2 installations (i.e., one for a desktop and one for a laptop computer).
Pano2VR and Object2VR Student and educational licenses are available upon request. Contact our support team for more information.
You can access all of your keys when you log in to your account on our website. If you have forgotten your password, click, Lost Password, to reset it. If you do not remember your account details at all, send us an email and we will try to help you.
You only need to upgrade your license if:
- Upgrading from Pano2VR light to Pano2VR pro or from Object2VR single user to ObjectVR studio or Object2VR pro
- Upgrading to a major release (i.e., from 5.0 to 6.0)
- Adding additional users
If you purchased your license from a reseller, please contact the reseller to upgrade your license.
If you purchased your license from the Mac App Store, please contact support to get your upgrade.
To upgrade:
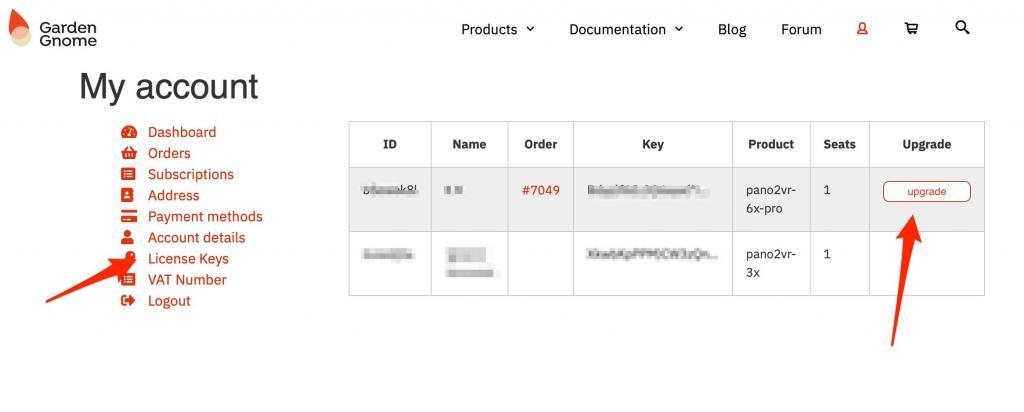
- Log in to your account at http://ggnome.com/my-account.
If you haven’t purchased a product on our site yet, but have purchased a license in the past, you can use Lost your password? and enter the email address associated with your license. You will then receive an email to reset your password. - Click License Keys to see all of your licenses.
- Click upgrade to see available options (upgrade to new version, or to add more users). If you don’t see upgrade next to your license, then no upgrades are available.
- On the next page, click Upgrade to go through the payment process.
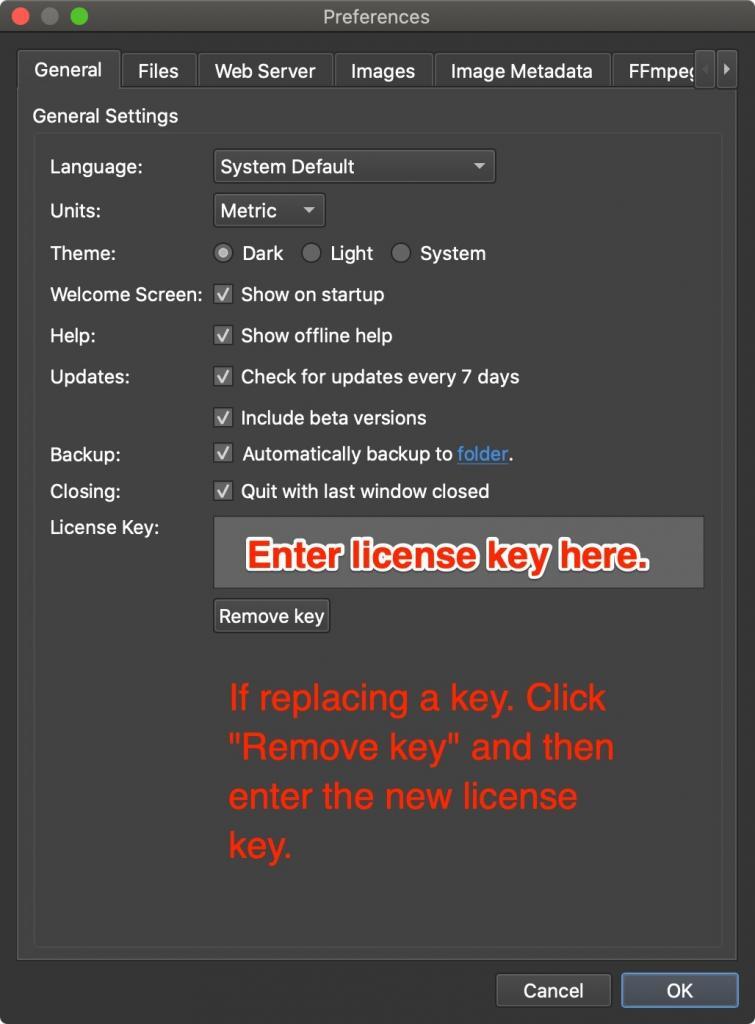
Once the payment is confirmed, you will receive an email containing your updated license. Your new license will also be available in your account. - Open Pano2VR and go to the settings or preferences. In the General tab, paste your new license in the license key field. If you see ““, click Remove key and then enter the new key.
Object2VR
- macOS 11 and later
- Windows 10 (1809 and later)
- Windows 11
Pano2VR
Most likely, not all files were uploaded to the server, or they are not located in the same directory. Make sure all the output files are in the project’s folder.
Visible vertical lines are usually caused by resizing the image in an image editor. Therefore, the line was created before the image was brought into Pano2VR. If you need to resize your panorama, we suggest using Pano2VR’s Transformation output as it uses pixel perfect remapping.
- macOS 10.14 or higher
- Windows 10 (1809 or later)/Windows 11 21H2.
See also: Installing Pano2VR
Purchase
Generally, the license will be in the name of the person that has purchased the license key. When checking out, you will see a Comment box. Here, you can provide an alternative name; or if you are purchasing more than one user, a company name (but not an e-mail address).
Alternatively, you can send us an e-mail to change the name if you did not do this at the point of purchase. Please note that a request can only be authorized by the original purchaser, and a license can only be put in a company name if the license is for two or more users.
Our products are available to purchase online. When you purchase our software, you are buying a license which will remove the watermarks from the trial version. Boxed versions of our software are not available.
To order a single-user license
- Go to the product page:
- Scroll down or click, Buy it, to bring you to the Buy a license key, section.
- Choose a product version and click, Add to Cart.
- Choose Proceed to checkout or Check out with PayPal.
- On the Checkout page, fill out the billing details and add your email address.
- This email address and name you provide will be associated with the license key. To use a different name (i.e your company name) for the license, please add this under Additional Information.
- Choose a payment option and continue to finalize payment.
- Payment complete. Once the payment is complete, your license key will appear on the screen and will be sent to you via the email address you provided. It will also be available in your account, under License Keys.
To order a multi-user license
- Go to the product page:
- Scroll down or click, Buy it, to bring you to the Buy a license key, section.
- Click the software icon – not the Add to Cart button.
- Enter the number of users you will need.
- Click, Add to Cart.
- Choose Proceed to checkout or Check out with PayPal.
- On the Checkout page, fill out the billing details and add your email address.
This email address and name you provide will be associated with the license key. To use a different name (i.e your company name) for the license, please add this under Additional Information. - Choose a payment option and continue to finalize payment.
- Payment complete. Once the payment is complete, your license key will appear on the screen and will be sent to you via the email address you provided. It will also be available in your account, under License Keys.
Please send an email to support@ggnome.com to inquire about other payment options.
No. If you’ve ordered a license in the past, you can activate your account by requesting a new password:
- Click the Login button at the bottom of the page.
- Click, Request new password.
- Enter the email address associated with your license. You’ll be sent an email with an activation link.
- Follow the activation link to reset the password.
- Log in with your new password.
If you’re having troubles accessing your account, just send us an email and we’ll get you sorted out.
Pano2VR and Object2VR Student and educational licenses are available upon request. Contact our support team for more information.
Generally we do not give refunds. We do, however, offer a fully functional trial version of all of our software (albeit watermarks on output). We recommend first trying our software to see if it fits your needs before purchasing a license.
Yes! When checking out, enter your VAT ID in the field provided.
You can check the validity of your VAT ID on this site.