3D Model Properties
Choose the model file and how it is optimized for the web, place the model in the tour, and set how it behaves in transitions.
These properties appear in the Properties panel when a 3D model node is selected in the Tour Browser. They set which model file is used and how it is prepared for the web, where the model sits in the tour, and how it behaves during transitions.
Input
3D Model
Type – The kind of model. Pano2VR sets the type from the file extension when you add or replace the model, so you rarely need to change it:
- 3D Mesh (glTF/GLB) – A 3D mesh in a
.glbor.gltffile. - Gaussian Splat – A
Gaussian splat in a
.ply,.splat,.ksplat,.spz,.sog, or optimized.radfile. - 3D Tiles – A 3D Tiles tile set, added through its
.jsonfile. Some 3D Tiles exporters store their.b3dmtiles gzip-compressed. The Integrated Web Server detects this and tells the browser; on your own web server, serve those files with theContent-Encoding: gzipheader.
File – The model file. Drag the file here, or click the folder icon to choose one. You can also drag model files straight into the Tour Browser to add new model nodes.
Optimize
The optimization settings keep large models fast in the browser. Which settings you see depends on the model type.
Optimize on output – (3D meshes) Select to create a smaller, web-friendly copy of the model, plus a separate version for phones and tablets, each time you generate the output. This is selected by default. Deselect it to export the original model file instead, and to add your own phone version under Mobile Version.
Click the Tools button next to it to open the Optimization Options:
-
Desktop Max. Texture – The largest texture size in the desktop version: 1k, 2k, 4k, 8k, or 16k. The default is 4k. See texture size.
-
Mobile Max. Texture – The largest texture size in the version for phones and tablets: Desktop, 1k, 2k, or 4k. The default is 1k. Choose Desktop to skip the separate mobile version and use the desktop version everywhere.
-
Format – The texture image format: Original, WebP, JPEG, PNG, AVIF, ETC1S KTX2, or UASTC KTX2. The default is WebP.
-
Quality – The texture quality, from 0 to 100. The default is 70.
-
Remove Textures – Select to leave all textures out, for example when the model is only used for transitions and the panoramas are projected onto it. This makes the output much smaller. The texture settings above are dimmed while this is selected.
-
Optimize Geometry – Select to compress the model’s geometry with Draco compression. This is selected by default. Click Advanced Geometry Settings to fine-tune the compression:
- Method – Edgebreaker (the default) or Sequential.
- Encode Speed and Decode Speed – From 0 to 10. The default for both is 5.
- Position Bits, Normal Bits, Texcoord Bits, Color Bits, and Generic Bits – How many bits each kind of data keeps, from 1 to 30. Fewer bits give a smaller file but less precision. The defaults are 14, 10, 12, 8, and 12.
- Quantization Volume – Mesh (the default) or Scene.
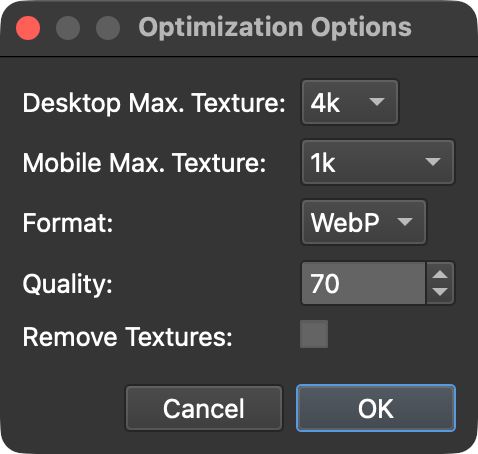
The Optimization Options for a 3D mesh.
Optimize – (Gaussian splats) Choose whether Pano2VR works with an optimized copy of the splat. An optimized splat is a RAD file with levels of detail: the player loads it in pieces, so the model appears quickly and gains detail as the rest arrives.
- Off – The original file is used everywhere, in the Viewer and in the output.
- Input – Pano2VR creates the optimized RAD file right away and uses it in the
Viewer as well as in the output. The file is saved next to the original, with
_optimizedadded to its name, and is shown under Optimized File. Choose this for large splats that are slow to work with in the Viewer. - Output – The Viewer shows the original file, and the optimized version is created when you generate the output. This is the default.
When you add a splat with more splats than the limit set under
Settings > 3D Model, Pano2VR offers to
create the optimized file straight away and sets Optimize to Input if you
agree. If an optimized file with the same number of splats already sits next to
the original, it is used instead of being created again. If the original file is
already an optimized .rad file, the Optimize options are dimmed.
Click the Tools button to open the Splat Optimization Options:
- Maximum SH Degree – The highest degree of spherical harmonics kept in the optimized splat, from 0 to 3. The default is 3. Spherical harmonics store how each splat’s color changes with the viewing angle. Lower values make the file smaller at the cost of those view-dependent effects.
Chunk output – (Gaussian splats) Select to export the optimized splat as
a small metadata file plus separate chunk files. Deselect it to export a single
RAD file. This is selected by default, and it is available whenever an optimized
file is exported: with Optimize set to Input or Output, or when the model
file is already a .rad file.
Optimized File – (Gaussian splats) The optimized RAD file, shown when Optimize is set to Input.
A missing optimized file is listed in the Locate Missing Files window when you open the project, so you can point Pano2VR to where it now lives. If you open the node while the file is still missing, Pano2VR offers to create it again from the original. Until it is back, the model stays hidden: the point of the Input setting is to keep the full-size original out of the Viewer. To work with the original instead, set Optimize to Off.
Mobile Version – An alternative model file for phones and tablets. It is available while optimization is off: with Optimize on output deselected for a 3D mesh, with Optimize set to Off for a Gaussian splat, and always for 3D Tiles.
Preview Image
File – The preview image is used as the model’s thumbnail in skins and menus. If left empty, the Tour Browser’s low-resolution default view is used. To choose a different view or a custom graphic, click the folder icon and choose an image, or drag the image to File.
Click the camera button (Capture Preview Image) to capture the current view in the Viewer. This captures a higher resolution image than the Tour Browser’s thumbnail.
Pano2VR can also capture the preview image automatically: when you set the model’s Default View, a dialog asks whether to create a new preview image for the updated view. Choose Yes or No for this one time, or Always or Never to skip the question in the future. You can change this behavior later with Generate Preview Image in Settings > Advanced.
Background Image
The background image surrounds the 3D model as its sky. If no background image is set, transitions to and from the model project the panoramas of the connected nodes onto the sky instead of showing the background color.
Type – Choose how the background image is read:
- Solid Color – No image. Click the color button to choose the background color.
- Auto – Pano2VR detects the image type. This is the default.
- Equirectangular
- Cube Faces
- Strip
- Cross
- Tee
File – The background image. Click the folder icon to choose the image, or drag it to File.
Convert Input
The convert image settings here are identical to those in the Panorama settings.
Hide in Node List – Select to leave the model out of the node lists and menus in the output, for example when the model is only used for transitions between panoramas and is not meant to be visited on its own.
3D Model
These properties place the model in the tour and set how it behaves while visitors move through it.
Lock 3D Model – Select to lock the model’s placement. While it is selected, Position, Rotation, and Scale are dimmed, and Manipulate 3D Model mode is not available. When you unlock a model that contains camera points, Pano2VR warns you first, because moving the model moves it away from the camera points that were aligned to it.
Position – The model’s location in the tour’s 3D space, as X, Y, and Z coordinates.
Rotation – The model’s orientation, as rotation angles around the X, Y, and Z axes.
+45 to turn the model another 45 degrees. Double-click the Position or Rotation label to reset its values to zero.Scale – The size of the model relative to its original dimensions.
Units / Meter – How many of the model’s units make one real-world meter. 3D software saves models in different units (meters, centimeters, and so on), so set this value to get the right eye height and speed in the Walk camera mode.
If you do not know the value, click the ruler button (Measure Distance in 3D Model). Click one end of a feature whose real size you know, like a door opening or a wall, then click the other end. Enter the real distance in the dialog that opens, and Pano2VR calculates Units / Meter for you.
Fly Speed – How fast the camera moves in the Fly camera mode. The default is 1. Enter 2 to fly twice as fast, or a value between 0 and 1 to fly more slowly.
Use model textures in transitions – Select to show the model’s own textures during transitions between panoramas. Deselect it to use only the model’s geometry and project the panoramas onto it. This is selected by default.
- If the model is high quality and its textures match the panoramas closely, the model textures give smooth transitions.
- If the model’s textures differ from the panoramas, for example in lighting, color, or because the space changed between captures, projecting the panoramas usually looks more consistent.
A waypoint on the transition’s path can override this setting for that transition.
Load model on start – Select to load the model as soon as the tour starts, so a transition that uses the model does not have to wait for it.
Materials – (3D meshes and 3D Tiles) Choose which materials the model uses in the output:
- Keep Original Materials – Use the model’s own materials, including their lighting and shading.
- Replace with Transition Materials – Replace the materials with a special material that lets panoramas be projected onto the model during transitions. Complex materials may not convert cleanly and can show artifacts. Generate the output to see the result.
- Replace with Basic Materials – Replace the materials with a basic material that shows only the texture, without any extra lighting or shading. This works well for models made from photographs, where light and shadow are already part of the texture. Models built in 3D software can look flat with it.
Reveal – (Gaussian splats) Choose how the splat appears when it is shown: Instant shows it at once, Spread lets it grow outward from the center. With Spread, set the Speed from 0.1 to 10. The default is 1.
Tags – Tags for the model. They are added to every tour node that has a camera point in this model, but not to the model node itself. Use them, for example, to filter the Tour Browser for the nodes that are, or are not yet, placed in a certain model, or in the Skin Editor, since the nodes carry these tags in the output too.
Advanced
Camera Near Plane – The closest distance, in model units, at which the model is still drawn; anything closer to the camera is cut off. The default is 0.01. If surfaces flicker where they overlap, raise this value. If nearby geometry disappears when you move close to it, lower it.
Camera Far Plane – The farthest distance, in model units, at which the model is still drawn; anything beyond it is cut off. The default is 100. Raise this value if distant parts of a large model disappear. The far plane always stays greater than the near plane: if you enter a value that conflicts with the other plane, Pano2VR adjusts the other plane.
Material Side – (3D meshes) Choose which side of the model’s faces is drawn:
- From File – Use the sides defined by the model’s materials. This is the default.
- Front Side – Draw only the front faces.
- Back Side – Draw only the back faces.
- Double Side – Draw both sides. Useful if parts of the model are invisible from some angles, for example walls that were modeled as single surfaces.
You can also change this in the tour with the Set Material Side skin action.
Play first Animation – (3D meshes) Select to play the model’s first animation in an endless loop as soon as the model is loaded. To start animations on a click instead, use the 3D model skin actions, as shown in Create an Interactive 3D Object.
Model Transformation
A transformation applied to the model’s geometry itself, inside the model’s own Position, Rotation, and Scale. Use it to correct how a model sits in its own coordinate system, for example to stand a georeferenced model upright, so that the properties in the 3D Model section stay free for placing the model in your tour. The Position here was previously called Center.
Locked – Select to keep the transformation from being edited. This locks only the three properties below. The model’s own placement stays editable and is locked separately with Lock 3D Model.
Position – The offset applied to the model’s geometry, as X, Y, and Z coordinates.
Orientation – The rotation applied to the model’s geometry, as rotation angles around the X, Y, and Z axes.
Scale – The size of the model’s geometry relative to its original dimensions.
Double-click the Position or Orientation label to reset its values to zero.
When you add a model, Pano2VR centers it here and sets the model’s Scale so that it arrives at a workable size, whatever units it was saved in. A Gaussian splat is measured from the bulk of its points, so that a few stray points far outside the scene do not shrink the rest of it, and a splat with levels of detail is measured once its first detail has arrived.
Pano2VR also fills in the Orientation when a model needs turning to sit correctly: a georeferenced 3D Tiles model gets the rotation that stands it upright, and a Gaussian splat gets the half turn that puts it the right way up. In both cases the model’s own Rotation stays at 0/0/0, so it remains yours to set. A georeferenced 3D Tiles model also gives the node its GPS position in the User Data, if the node does not have one yet.
Background Sound
The background sound properties are identical to the panorama’s properties.