Panorama Node Properties
The Panorama Properties provides the current node's file location, is where a panorama can be converted and leveled, and where background sound is added.
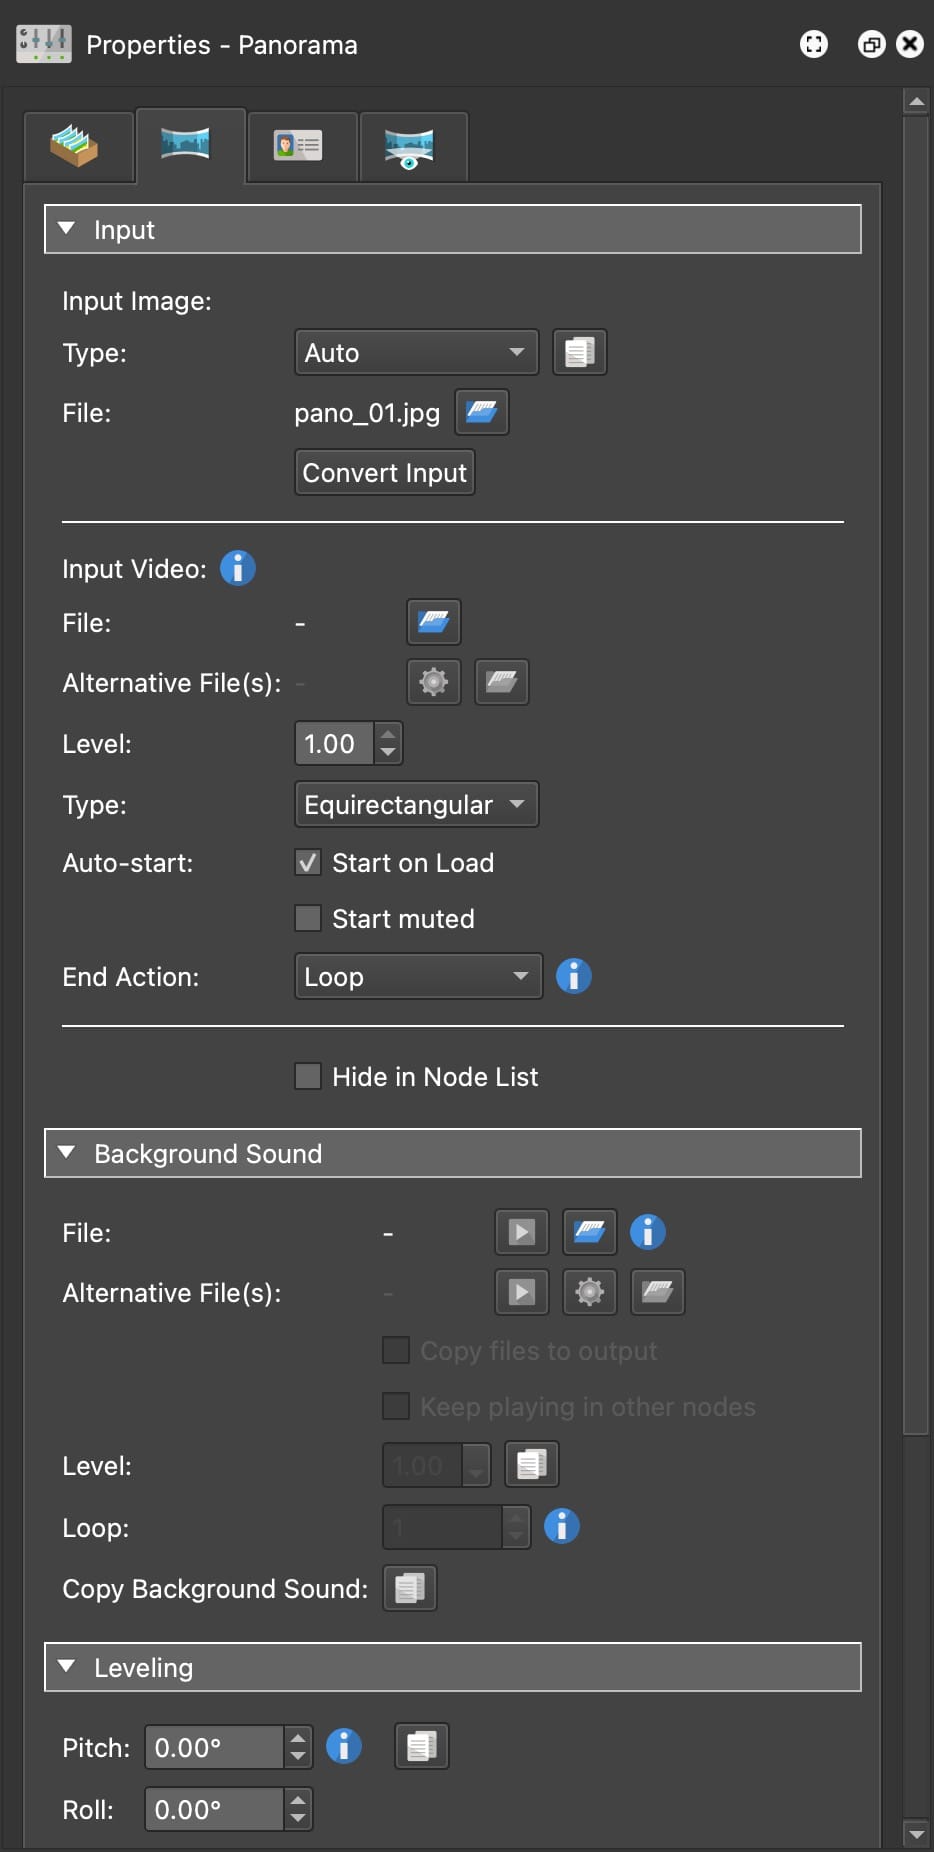
Input
Input Image
Type – You can either let Pano2VR figure out which type of image is being imported by choosing Auto, or you can select an image type from the menu:
-
Auto – Auto will determine the type of image automatically and is the default setting.
In a tour, use the copy button next to Type to copy the input type to all nodes (Pro only).
Stereo Pair – This setting will appear if the image is a stereo panorama. Choose from Left/Right or Right/Left. Pano2VR will always show the Right side. In a tour, use the copy button to copy the stereo order to all nodes (Pro only).
Horizontal FoV – This setting will appear if the input type is Flat or Cylindrical, or if the panorama itself is cylindrical. Adjust the horizontal field of view of the image (0.1° to 360°).
File – Enter the path of the image, or click the folder icon to choose the image. You can also drag the image onto File.
If Cube Faces is selected as the type, six file fields appear instead, one for each cube face: Front, Right, Back, Left, Top, and Bottom.
Convert Input
Click to open the Convert Panorama options to change the panorama to a different panorama type, like cube faces. Learn how to convert images.
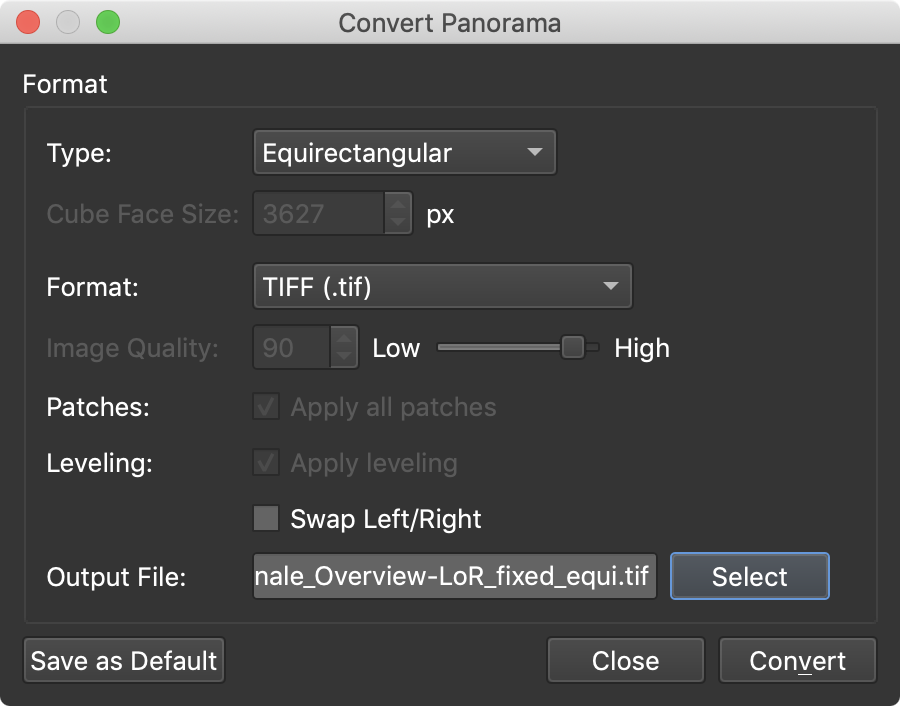
Type – Choose the image type to convert to.
Cube Face Size – Set the size of the cube faces in pixels. The lowest value, auto, lets Pano2VR calculate the size for each panorama. This field is available when you convert an equirectangular panorama to one of the cube types. When you convert cube faces to an equirectangular image, the field is labeled Width and sets the width of the output image instead. If Type is set to Cube Faces, Face Names also appears, so you can choose the naming convention of the cube faces.
Format – Choose the image format to convert to, for example TIFF, JPEG, PNG, WebP, or JPEG XL. If you have a very large project with lots of nodes, we recommend converting all images to TIFF. Also, if you’re using a gigapixel image, we recommend converting it to BigTIFF (if it’s in PSB format) to make use of the tiled TIFF format that Pano2VR uses. Pano2VR loads these images much faster. See: Working with Large Projects
Format Settings – These settings appear for TIFF, JPEG, WebP, and JPEG XL. Which ones you see depends on the format and, for TIFF, on the compression.
-
Compression – For TIFF, choose how the image data is compressed: none, ZIP, JPEG, WebP, or JPEG XL. ZIP preserves image quality with moderate compression, while JPEG, WebP, and JPEG XL give much smaller files and use the Quality setting.
-
Transparency – Select No alpha channel to save the image without its alpha channel. Available for WebP and JPEG XL, and for TIFF with none, ZIP, WebP, or JPEG XL compression.
-
Quality – Set the image quality from 1 to 100 for JPEG, WebP, and JPEG XL, and for TIFF with JPEG, WebP, or JPEG XL compression. A higher value results in better image fidelity and fewer compression artifacts, but also increases file size. Lower values reduce file size but may introduce visible compression artifacts. For JPEG XL, a value of 100 saves the image without any loss. The default is 90.
-
Effort – Set how hard the JPEG XL encoder works, from 1 to 10. Available for JPEG XL and for TIFF with JPEG XL compression. Higher values take longer to save but usually produce smaller files. The default is 7.
-
Organization – Select Strip to organize the image in strips instead of tiles. Use this if other software expects the image in strips rather than tiles. Available for TIFF with none or ZIP compression.
Patches – If you’ve added patches to the panorama, select Apply all patches to include them in the converted image.
Leveling – If you’ve applied leveling to the panorama, select Apply leveling to apply the leveling to the converted image.
Swap Left/Right – If you have a Left/Right Stereo image, select this to swap the right and left images if needed.
Output File – Name the converted file and choose a new location.
Save as Default – Click to save the current settings as the default. This is especially useful when there are many images to convert.
Input Video
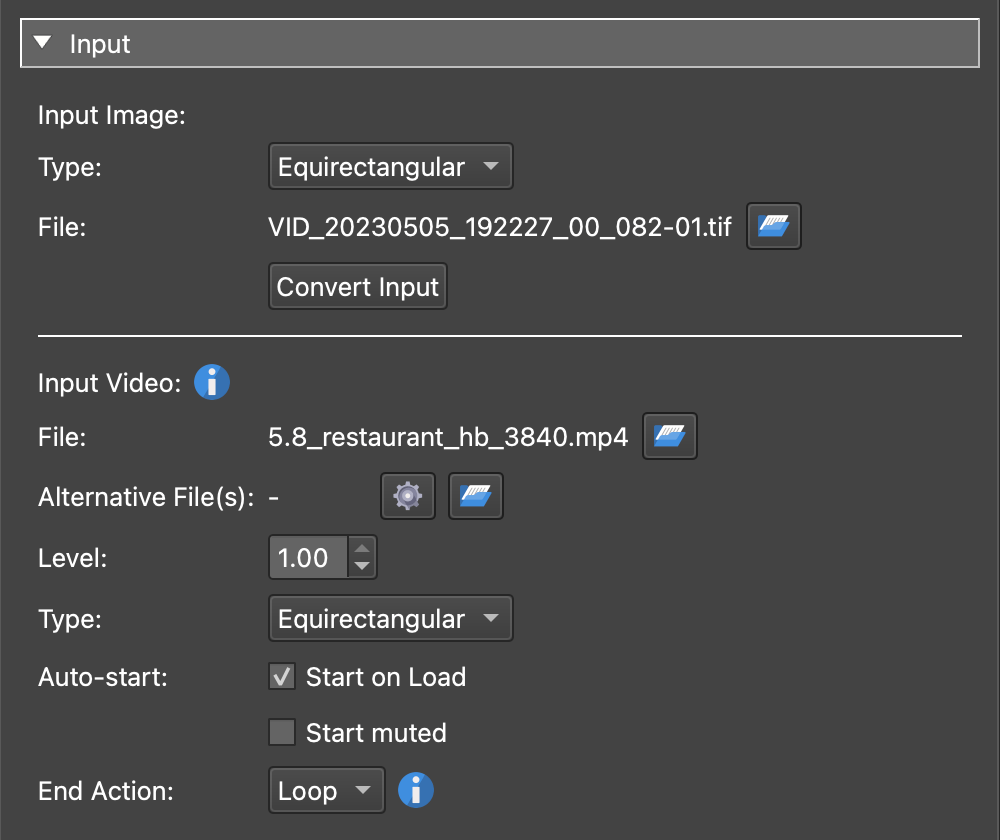
To add a panoramic (360º) video, drag the file to the Viewer, Tour Browser, or to File. Alternatively, click the folder and navigate to the file.
Learn more: Working with 360º Video
File – Click the folder to add a panoramic video. Alternatively drag the video file and drop it here.
Alternative File(s) – Add alternate versions of the video. These could be different resolutions or codecs. When local files include complete media metadata, the web player asks the browser which versions the device can decode smoothly and starts with the highest suitable resolution. If that capability information is unavailable, the files are tried in their listed order.
Use Convert Video File (cog wheel) to generate a web-friendly version of the video. See: Creating 360 Video Tour
The built-in converter shows the output formats supported by Qt Multimedia on the current computer and provides preset maximum video sizes.
Subtitles – Adds a subtitle track to the video panorama. The menu is available once a video file is set, and new nodes start without subtitles.
- None – The video has no subtitle track.
- Automatic – Pano2VR uses a
.vttor.srtfile with the same name as the video, and translated files with a language suffix, liketour_de.srt. The files that were found are listed below the menu. - File – Choose a specific subtitle file in Subtitle File.
SRT files are converted to WebVTT on output. Because the video panorama is drawn by WebGL, the browser can’t show the subtitles on the video itself. Instead, the active subtitle text is written into a skin variable, and a text element in your skin displays it. The following settings appear when Subtitles is set to Automatic or File:
- Kind – Marks the track as Subtitles or Captions. Captions also describe sounds other than speech.
- Text Variable – The name of the skin variable that receives the subtitle text. Click the button next to the field to pick a text variable from the skins of the project’s web outputs.
Level – The volume of the video panorama, from 0 to 1.
Pano2VR can’t tell whether a video has an audio track. If the video panorama (or
a pinned video) has no audio and should not count for the
Has Sounds
logic block trigger, set its level to 0.
Type – Choose the video format. When a video file is added, Pano2VR detects the type automatically: videos with a 3:2 aspect ratio are set to Video 3×2, all others to Equirectangular.
-
Video 3×2
-
Equirectangular (default)
-
Equirectangular Stereo
-
VR180
-
VR180 stereo
Auto-start – This setting determines how the video will play back if a browser prevents play back if it has audio.
-
Start on Load – Select this to start playing the video once it’s loaded. If deselected, the video panorama will not play when loaded and will need a way for the user to manually play the video back.
-
Start muted – Some browsers prevent video playback if there is audio. When this is selected, the video will play with the audio muted (audio will be turned on as soon as the user interacts with the panorama).
End Action – Choose what happens once the video ends:
-
Loop – The video will continuously play.
-
Stop – The video will stop after it is finished playing.
-
Exit – The video will exit and the input image will be displayed.
In a tour, you can also choose a Tour Node to open when the video ends. Choosing a tour node is available in Pano2VR Pro only. The Target View menu then sets the view the node opens with:
-
Default View – This will open the tour node at its Default View.
-
Current View – This opens the next node in the same view (pan, tilt, FoV) that is currently displayed in the Viewer.
-
Forward – This view requires GPS data so that it can point forward when moving from one node to the next. It will keep the same pan/tilt/FoV values while correcting for North so the direction is always looking forward.
-
Backward – This view requires GPS data so that it can point backward when moving from one node to the next. Like Forward, it keeps the same pan/tilt/FoV values while correcting for North, so the view always looks backward.
-
Specific View – Enter the Pan, Tilt, and Field of View values separated by slashes to set the opening view:
pan/tilt/fov.
Hide in Node List – Select this option to prevent the current node from appearing in cloner or map elements. Hotspots to and from the panorama will still work.
Background Sound
Here you can add a single background sound. It will play in the background of the entire project.
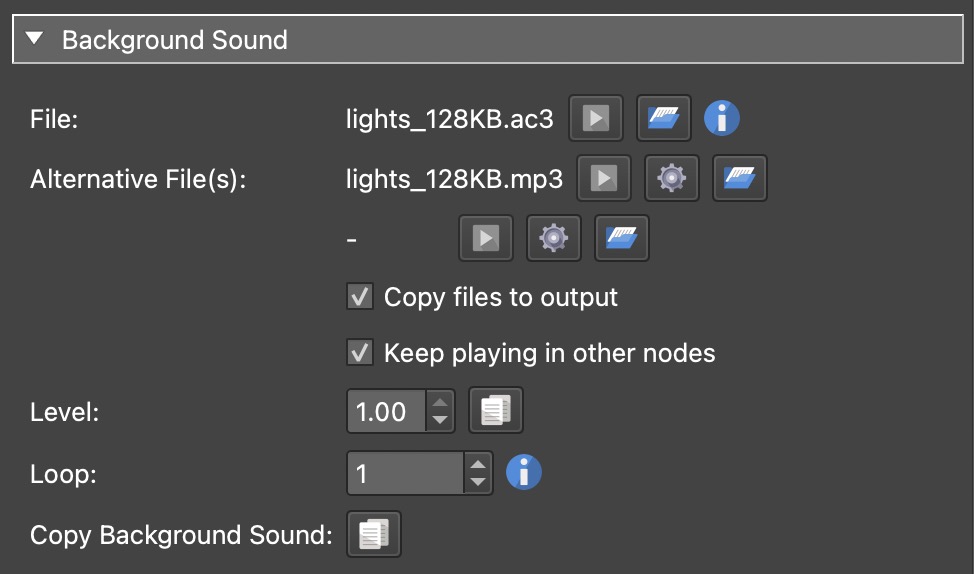
The background sound is assigned with the ID of _background which can be used
as a target for an action in the Skin Editor.
Many browsers, including those on iOS devices, don’t play sound before the viewer interacts with the tour, so add a button to the skin that starts and stops the sound.
When using direct node access, use the Copy button to copy the background sound and all of its settings to all nodes in a tour.
File – The audio file. Drag the file onto the field, or click the folder button and choose your sound file. Click the play button to listen to it. To remove the background sound, right-click the file name and choose Clear.
Alternative File(s) – Other versions of the sound in another format, for browsers that can’t play the main file. Up to three alternative files can be added; another field appears as soon as the previous one is filled. Click the gear button to convert the main file with the built-in converter, which offers only the formats the current computer can write.
Copy files to output – Select to copy the background sound and its alternative files into the output folder.
Keep playing in other nodes – Select to have the background sound continue to play when the viewer moves to another node.
Level – The volume of the sound, from 0 to 1. Use the copy button to copy the sound’s level to all nodes. Browsers don’t all play the same level at the same loudness, so a level of 0.3 may sound louder or softer in different browsers.
Loop – How many times the sound plays. Enter 0 for an endless loop, or
-1 to keep the sound from starting on its own; a button in the skin then has
to start it.
Copy Background Sound – Click to copy the background sound settings to all nodes. This button and the level’s copy button appear in tours with Pano2VR Pro.
Leveling
In order to get a good output from Pano2VR, the horizon needs to be known and the panorama needs to be level. Here, you can see at what angle the Pitch and Roll are currently.
You can also level the panorama directly in the Viewer: press and hold the L key and drag with the mouse.
In a tour, use the copy button next to Pitch to copy the leveling to all nodes (Pro only).
This is a tool that is especially helpful for panoramas coming from one-shot cameras like the Ricoh Theta.
Learn how to quickly level a panorama.