Skin Editor Canvas
The Canvas is where all the elements (images, buttons, etc.) are placed and arranged. Consider it your workspace for designing your skin.
Add an element to the canvas
To add an element to the Canvas, do one of the following:
-
Click on a tool in the toolbar and then click in the canvas.
-
Drag a file into the canvas: images and button images, sounds (MP3), SVG files, Lottie animations (JSON), and video files are added as the matching element type. Dropping a skin component file (
.ggskc) adds the component; dropping a skin file (.ggsk) opens that skin in the editor.
- Drag a node from the Tour Browser into the canvas to add a node marker.
-
In the menu bar, choose the element type from the Elements menu, then click in the canvas. The element is placed in the canvas and in the Tree.
-
Copy and Paste elements. Pasted elements are automatically given unique IDs.
Sound in the Canvas
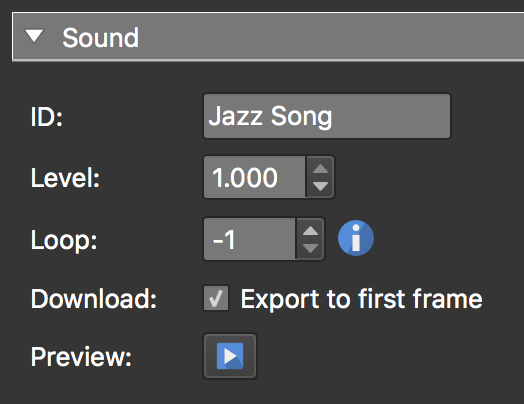
When adding a sound in the canvas, the sound will automatically be added at the bottom of the Tree. The sound will not be visible in the Canvas.
Click on the sound in the Tree to open its properties.
-
ID – The sound’s unique ID. The sound’s file name will be used by default. However, this can be changed.
-
Level – The output level of the sound. Maximum is 100% or 1.00 while the minimum is 0.
-
Loop – Choose how many times the sound file will repeat or loop.
-
Download – Select Export to first frame to have the sound available on the first frame of the panorama.
-
Preview – Click the play button to preview the sound.
Change the size of the canvas
Do any of the following to change the canvas size:
-
When no elements are selected, the properties of the canvas appear in the Properties section on the right.
-
Use Zoom. Choose a zoom percentage from the Zoom menu in the toolbar.
★ Tip When the canvas is larger than its window, press and hold the Space bar (the pointer changes to a hand) and drag to pan the canvas.
Select more than one element
Select elements in the Canvas by doing one of the following:
-
Drag over the elements. The first element that is hit by the cursor becomes the active element.
-
Command-click (macOS) or Ctrl+click (Windows) the elements.
Arrange, align and distribute the elements
To move elements do any of the following:
-
Drag the element. A selected element will have a thick red border and resize handles if the element is resizable.
-
You can move and resize more than one element at a time.
-
Press the arrow keys to nudge the selected elements by 1 pixel. Press and hold Shift to nudge by 10 pixels.
-
Press and hold Shift while dragging to constrain the movement to the horizontal or vertical axis.
-
Press and hold Command (macOS) or Ctrl (Windows) while dragging to temporarily invert the snapping behavior (Snap to Grid, Snap to Guides).
-
Press the Delete or Backspace key to delete the selected elements.
Align the elements
-
Select more than one element in the Tree or Canvas.
-
Choose Edit > Align Elements and the alignment, or right-click the selected elements in the Canvas and choose from the Align Elements submenu.
The elements will align themselves to the active element.
Distribute the elements
-
Select three or more elements in the Tree or Canvas.
-
Choose Edit > Distribute Elements and the distribution, or right-click the selected elements in the Canvas and choose from the Distribute Elements submenu.
Center the elements
- Select an element.
- From the Edit menu or the Canvas shortcut menu, choose Center Elements in Canvas.
- Choose Horizontal or Vertical from the submenu.
Make all selected elements the same size
-
Drag the handles of the active element to resize the active element plus the selected elements until they reach their minimum size. Release the mouse button.
-
Drag the active element’s handles again to resize all elements.
Match the size of the active element
Use Match Size of Elements in the Canvas shortcut menu or the Edit menu to match the selected elements to the size of the active element (thick red border). You can choose to match the width, height or both.
Edit an element in the expanded view
Scroll Area and Cloner elements have an expanded view where you can edit the elements they contain. To open it, double-click the element in the Canvas or Tree, or choose Expand Element from the Edit menu or the Tree’s shortcut menu.
While the expanded view is open, a breadcrumb path appears above the Canvas. Click Skin (or a parent element) in the path to leave the expanded view.
Hide or lock an element or group of elements
To hide elements do any of the following:
-
Click the eye icon to the left of the element in the Tree to hide.
To make an element invisible in the output, deselect Visible in its properties.
-
Right-click on the element or group of elements and choose Hide in Canvas.
-
Press Shift-Command-H (macOS) or Ctrl+Shift+H (Windows) to hide the selected elements.
To lock an element do any of the following:
-
Option-click (macOS) or Alt+click (Windows) the eye icon to the left of the element in the Tree.
-
Right-click on the element or group of elements and choose Lock in Canvas.
-
Press Command-L (macOS) or Ctrl+L (Windows) to lock the selected elements.
Shortcut Menu
Right-click selected elements in the Canvas for these commands:
-
Cut and Copy – Cut or copy the selected elements.
-
Lock in Canvas and Hide in Canvas – Lock or hide the selected elements in the Canvas only.
-
Reveal in Tree and Reveal in Canvas – Scroll the Tree or the Canvas to the active element.
-
Align Elements – Align the selected elements to the active element. Needs at least two selected elements.
-
Distribute Elements – Spread the selected elements evenly. Needs at least three selected elements.
-
Center Element in Canvas – Center the selected elements horizontally or vertically in the Canvas.
-
Match Size of Elements – Give the selected elements the width, the height, or both of the active element. Needs at least two selected elements.
-
Create Component from Selection – Save the selected elements as a component.
Change Skin Canvas Color
To change the color of the canvas, choose View > Canvas Background Color and a color. Choose Custom to pick any color with the system’s color picker.